Cookies op Kieskeurig.nl en de overige Reshift websites
Wij maken gebruik van cookies, en dit doen we:
Voor functionele en analytische doeleinden.
Om relevante advertenties te tonen.
Om te zorgen dat je kunt inloggen met je account.
Om onze dienstverlening te verbeteren voor onze gebruikers.
Om te zorgen dat Kieskeurig.nl gratis is en blijft.
Wil je meer weten over het gebruik van cookies en hoe wij hier mee omgaan. Lees dan onze complete privacy statement hier.
Waarom moet je eigenlijk akkoord gaan met cookies?
Cookies zorgen ervoor dat wij bepaalde functionaliteiten kunnen aanbieden aan onze gebruikers en onze klanten. Kieskeurig.nl is altijd al een gratis dienst voor en door gebruikers geweest. Om te zorgen dat we Kieskeurig.nl gratis kunnen houden tonen wij bijvoorbeeld advertenties. Cookies zorgen ervoor dat jij als gebruiker advertenties krijgt te zien die relevanter voor je zijn. Daarnaast zorgen cookies ook voor inzichten in hoe onze site presteert. Hierdoor kunnen we onze site blijven verbeteren.
Wil je meer weten over het gebruik van cookies en hoe wij hier mee omgaan. Lees dan onze complete privacy statement hier.
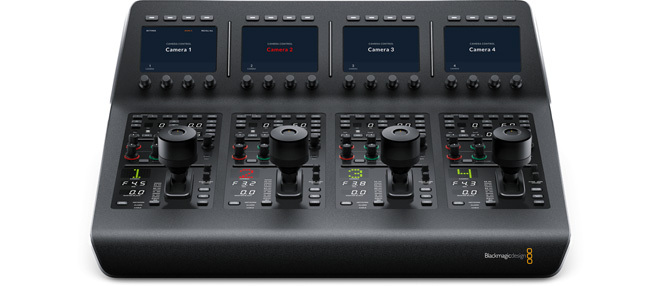
Remotely control four cameras, all from a single control panel!\nThe ATEM Camera Control Panel is a compact remote camera control unit designed to control up to four different URSA Broadcast, URSA Mini, Blackmagic Studio or Blackmagic Micro Studio cameras. The control panel features traditional broadcast style controls and adjustments so a single person can monitor and adjust a wide range of technical parameters such as black levels, gain, color balance, shutter speed and more. This leaves your camera operators free to focus on the more creative aspects of live production such as framing and composition. Unlike traditional CCU controllers, which have to be installed into a desk, the ATEM Camera Control Panel has been designed to be portable so it can simply be placed on any desktop or bolted down so it can be mounted in a slide out rack shelf. The controls are arranged in a familiar and logical layout, making it perfect for both experienced and new operators. Plus, it works with all ATEM switcher models!\n\nControl Four Cameras\nOne person can control 4 cameras!\nWhen working on live multi camera programs, it’s important to make sure all of the cameras are properly balanced and set up correctly so that you get consistent video from every angle. The ATEM Camera Control Panel features 4 camera controllers in one panel. Each camera controller includes a large LCD screen with soft buttons and knobs at the top of the panel, and a full set of professional controls below, on the main body of the panel.\n\nScene and Camera Controls\nThe top section lets you save and recall scene presets so you can quickly adjust cameras based on changes in the scene such as lighting. This section also includes controls for adjusting master gain, white balancing the camera and changing the camera’s shutter speed.\n\nWhite Balance\nQuickly set and adjust white balance.\n\nLoad Scenes\nSave and recall scene presets.\n\nMaster Gain\nBoost sensitivity of sensor in low light or when more depth of field is needed.\n\nShutter Speed\nSet the shutter speed of the camera.\n\nBars\nSelect to output color bars for the selected camera.\n\nGain and Pedestal Controls\nThe center section features independent RGB controls for gain and pedestal, or white and black. This allows you to adjust the individual red, green and blue levels in your blacks and whites to compensate for unwanted color.\n\nWhite\nIndependent RGB control for gain/whites.\n\nBlack\nAdjust the RGB values for pedestal/blacks.\n\nLens and Iris Controls\nThe bottom section features an LED camera number that indicates preview and on air status, along with a high quality professional joystick that’s used to precisely adjust the iris and master black. It also features a call button for talkback with the operator, along with a panel lock button and indicators for the network, power and cable connection to the camera.\n\nIris Control\nJoystick for adjusting iris and master black. Adjust up and down for iris, rotate for master black and push to select camera to monitor.\n\nCoarse Control\nSets the limit of the iris control on the joystick.\n\nIris and Master Black\nLocks the iris and master black controls on the joystick to prevent accidental changes.\n\nMaster Black\nControls the degree or level of black/pedestal without affecting contrast.\n\nPanel Active\nLock out the entire panel to prevent accidental changes.\n\nStatus Lights\nIndicate network connectivity, alarms and cable integrity.\n\nPreview\nUsed for sending the aux feed to the monitor so you don’t have to move the joystick.\n\nCamera Number\nLED dot display that indicates camera number and on air/preview status.\n\nCall Button\nFlashes tally light and sends tone to get operator’s attention.\n\nLive Production Workflow\nWorks seamlessly with ATEM switchers!\nThe ATEM Camera Control Panel connects directly to your ATEM live production switcher or ATEM hardware control panel via Ethernet. In many setups, you may be using multiple ATEM products such as an ATEM 4 M/E Broadcast Studio 4K switcher with an ATEM 1 M/E Advanced Panel and the ATEM Camera Control Panel. Ethernet can simply be looped from one ATEM device to another.\n\nFast and Easy Control\nWith traditional CCU controls, you can work much faster\nThe ATEM Camera Control is incredibly fast to use as it features traditional broadcast CCU controls so you get the benefit of years of broadcast experience. You can use the knob on the LCD to set the camera number, which turns red when a camera is on the air. The main joystick control can be moved vertically to adjust the camera iris while the knob can then be rotated to change the master black level. Pressing down on the knob will let you monitor the camera you’re currently controlling via the aux output of the switcher. Simply push the knobs to rapidly switch between cameras to ensure all your cameras match color. The ATEM Camera Control Panel is fast to set up so you can instantly start controlling the cameras that are connected to your switcher!
Denon RCDN-12 DAB+ CD-Speler met DAB/FM Internetradio, HDMI-aansluiting, HEOS®-Multiroomstreaming en Bluetooth- Zwart
Kleur(en)Zwart
Laatst bekeken
Login of registreer
Waarom betalen?
Wij verdienen ons geld met prijsvergelijkingen en advertenties (zie: https://www.kieskeurig.nl/verdienmodel). Wij kunnen onze diensten aanbieden zonder advertenties en bijbehorende cookies als je een betaald abonnement afsluit. Dat kost €99 per jaar, en heeft als voordeel dat wij je geen enkele advertentie laten zien en dat wij geen tracking cookies in jouw browser plaatsen.
Wil je toch gebruik maken van onze diensten zonder een abonnement?