Cookies op Kieskeurig.nl en de overige Reshift websites
Wij maken gebruik van cookies, en dit doen we:
Voor functionele en analytische doeleinden.
Om relevante advertenties te tonen.
Om te zorgen dat je kunt inloggen met je account.
Om onze dienstverlening te verbeteren voor onze gebruikers.
Om te zorgen dat Kieskeurig.nl gratis is en blijft.
Wil je meer weten over het gebruik van cookies en hoe wij hier mee omgaan. Lees dan onze complete privacy statement hier.
Waarom moet je eigenlijk akkoord gaan met cookies?
Cookies zorgen ervoor dat wij bepaalde functionaliteiten kunnen aanbieden aan onze gebruikers en onze klanten. Kieskeurig.nl is altijd al een gratis dienst voor en door gebruikers geweest. Om te zorgen dat we Kieskeurig.nl gratis kunnen houden tonen wij bijvoorbeeld advertenties. Cookies zorgen ervoor dat jij als gebruiker advertenties krijgt te zien die relevanter voor je zijn. Daarnaast zorgen cookies ook voor inzichten in hoe onze site presteert. Hierdoor kunnen we onze site blijven verbeteren.
Wil je meer weten over het gebruik van cookies en hoe wij hier mee omgaan. Lees dan onze complete privacy statement hier.
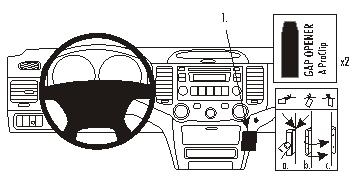
The ProClip is a mounting bracket for the vehicle's dashboard. Onto the ProClip you can install e.g. a holder for your mobile phone or PDA or a handsfree set etc. Safe and convenient -always within easy reach. The ProClip is car specific and easy to install. The installation is quick, no special tools or dismantle of the dashboard is required and it will not damage the interior of the vehicle. Made in black ABS plastic. Comes with detailed instructions. Angled mount Please read all of the instructions and look at the pictures before attaching the ProClip. This ProClip is divided into two parts, which will be referred to as Part 1 and Part 2: Part 1: The attaching part (the smallest part) Part 2: The ProClip faceplate
1. Press the thin end of the enclosed gap openers into the gap between the center console panel frame and the console edge, to widen the gap. Peel off the cover of the adhesive tape on Part 1.
2. Place the angled edge of Part 1 against the gap between the openers. Press the angled edge firmly into the gap and at the same time bend Part 1 to the right until you see or hear/feel it snaps into place, and the adhesive tape attaches to the console edge. Pull out the gap openers.
3. Press a screwdriver (Philips) firmly through the predrilled holes in Part 2 to open them up. Peel off the cover of the adhesive tape on Part 2. Place Part 2 onto Part 1 so the holes match and the adhesive tape on Part 2 is on the left side. Do not attach the tape to the center console panel frame yet. Screw Part 2 onto Part 1 using the enclosed screws. Right before you tighten the screws press the ProClip to the right with your thumb for optimal adjustment of the mount. Hold it in that position and tighten the screws.
Flir ONE Next Gen Warmtebeeldcamera voor Android USB-C Apparaten
Kleur(en)Grijs
Laatst bekeken
Login of registreer
Waarom betalen?
Wij verdienen ons geld met prijsvergelijkingen en advertenties (zie: https://www.kieskeurig.nl/verdienmodel). Wij kunnen onze diensten aanbieden zonder advertenties en bijbehorende cookies als je een betaald abonnement afsluit. Dat kost €99 per jaar, en heeft als voordeel dat wij je geen enkele advertentie laten zien en dat wij geen tracking cookies in jouw browser plaatsen.
Wil je toch gebruik maken van onze diensten zonder een abonnement?